保姆级教程,看这一篇就够用了。
在翻阅了网络上很多资料后,发现很多版本的信息比匹配。
花了一周的时间配置环境,以及环境验证,然后写了这篇长文。
有过程,有代码,有经验,欢迎大家批评指正。
一、环境准备
将宿主机和开发板接入同一个局域网,方便开发。
(一)宿主机
- PC电脑,
x86_64, 带显卡, 配置不表, 能训练和开发即可。
- 系统:
ubuntu 22.04 LTS 版本( ubuntu 18.04 LTS 以上)
- 自带的远程软件:
Remmina 可以建立 ssh 连接,也可以建立 sftp 连接传输文件。
Anaconda: 可以配置 python 开发的虚拟环境- 需要在宿主机上安装 RKNN-Toolkit2
用于在 PC 端将用户训练的模型转换为 RKNN 模型。
RKNN-Toolkit2 是为用户提供在 PC 平台上进行模型转换、推理和性能评估的开发套件,用户通过该工具提供的Python 接口可以便捷地完成以下功能:
- 模型转换:支持
Caffe、TensorFlow、TensorFlowLite、ONNX、DarkNet、PyTorch 等模型转为 RKNN 模型,并支持 RKNN 模型导入导出, RKNN 模型能够在 Rockchip NPU 平台上加载使用。
- 量化功能:支持将浮点模型量化为定点模型,目前支持的量化方法为非对称量化(asymmetric_quantized-8),并支持混合量化功能。
- 模型推理:能够在
PC(Linux x86平台)上模拟 Rockchip NPU 运行 RKNN 模型并获取推理结果;或将 RKNN 模型分发到指定的 NPU 设备上进行推理并获取推理结果。
- 性能和内存评估:将
RKNN 模型分发到指定 NPU 设备上运行,以评估模型在实际设备上运行时的性能和内存占用情况。
- 量化精度分析:该功能将给出模型量化前后每一层推理结果与浮点模型推理结果的余弦距离,以便于分析量化误差是如何出现的,为提高量化模型的精度提供思路。
- 模型加密功能:使用指定的加密等级将
RKNN 模型整体加密。因为 RKNN 模型的加密是在 NPU 驱动中完成的,使用加密模型时,与普通 RKNN 模型一样加载即可, NPU 驱动会自动对其进行解密。
目前只支持 Ubuntu 18.04 LTS 以上版本系统。由于 github https://github.com/rockchip-linux/rknn-toolkit2 下载较慢,可以直接网盘下载:百度网盘-RKNN-Toolkit2 提取码: 8888
(二)开发板
- 整机,用的是
RK3588 整机。(NOTE: 我这里用的是定昌电子提供的整机,其他设备没有尝试)
- 系统:
ubuntu 20.04 LTS 版本
- 需要在开发板上安装 RKNPU2
1. RKNPU2
RKNPU2 提供了高级的接口访问 Rockchip 的 NPU ,可以在板端做很多应用。由于 github https://github.com/rockchip-linux/rknpu2 下载较慢,可以直接网盘下载: 百度网盘-RKNPU2 提取码: 8888
1.4.0
- Support more NPU operators, such as Reshape、Transpose、MatMul、 Max、Min、exGelu、exSoftmax13、Resize etc.
- Add Weight Share function, reduce memory usage.
- Add Weight Compression function, reduce memory and bandwidth usage.(RK3588/RV1103/RV1106)
- RK3588 supports storing weights or feature maps on SRAM, reducing system bandwidth consumption.
- RK3588 adds the function of running a single model on multiple cores at the same time.
- Add new output layout NHWC (C has alignment restrictions) .
- Improve support for non-4D input.
- Add more examples such as rknn_yolov5_android_apk_demo and rknn_internal_mem_reuse_demo.
- Bug fix.
在板端测试运行
- RKNN-Toolkit-Lite2 为 Rockchip NPU 平台(RK3566、RK3568、RK3588、RK3598S)提供 Python 编程接口,帮助用户部署 RKNN 模型并加速 AI 应用程序的实现。
刷机(非必要不刷机)
非必要不刷机,一般情况下购买的板子已经刷好了系统,可以直接运行,我这里只测试了一个板子,其他板子未确定环境是否符合要求。
刷机工具: 百度网盘-刷机工具 提取码: 8888
刷机系统: 百度网盘-刷机系统 提取码: 8888
刷机过程可以参考(过程类似):
【边缘设备】基于RK3399核心板的nanoPC-T4 线刷桌面版系统
二、环境验证
(一)板端验证
百度网盘-rknn_yolov5_rk3588_v14 提取码: 8888
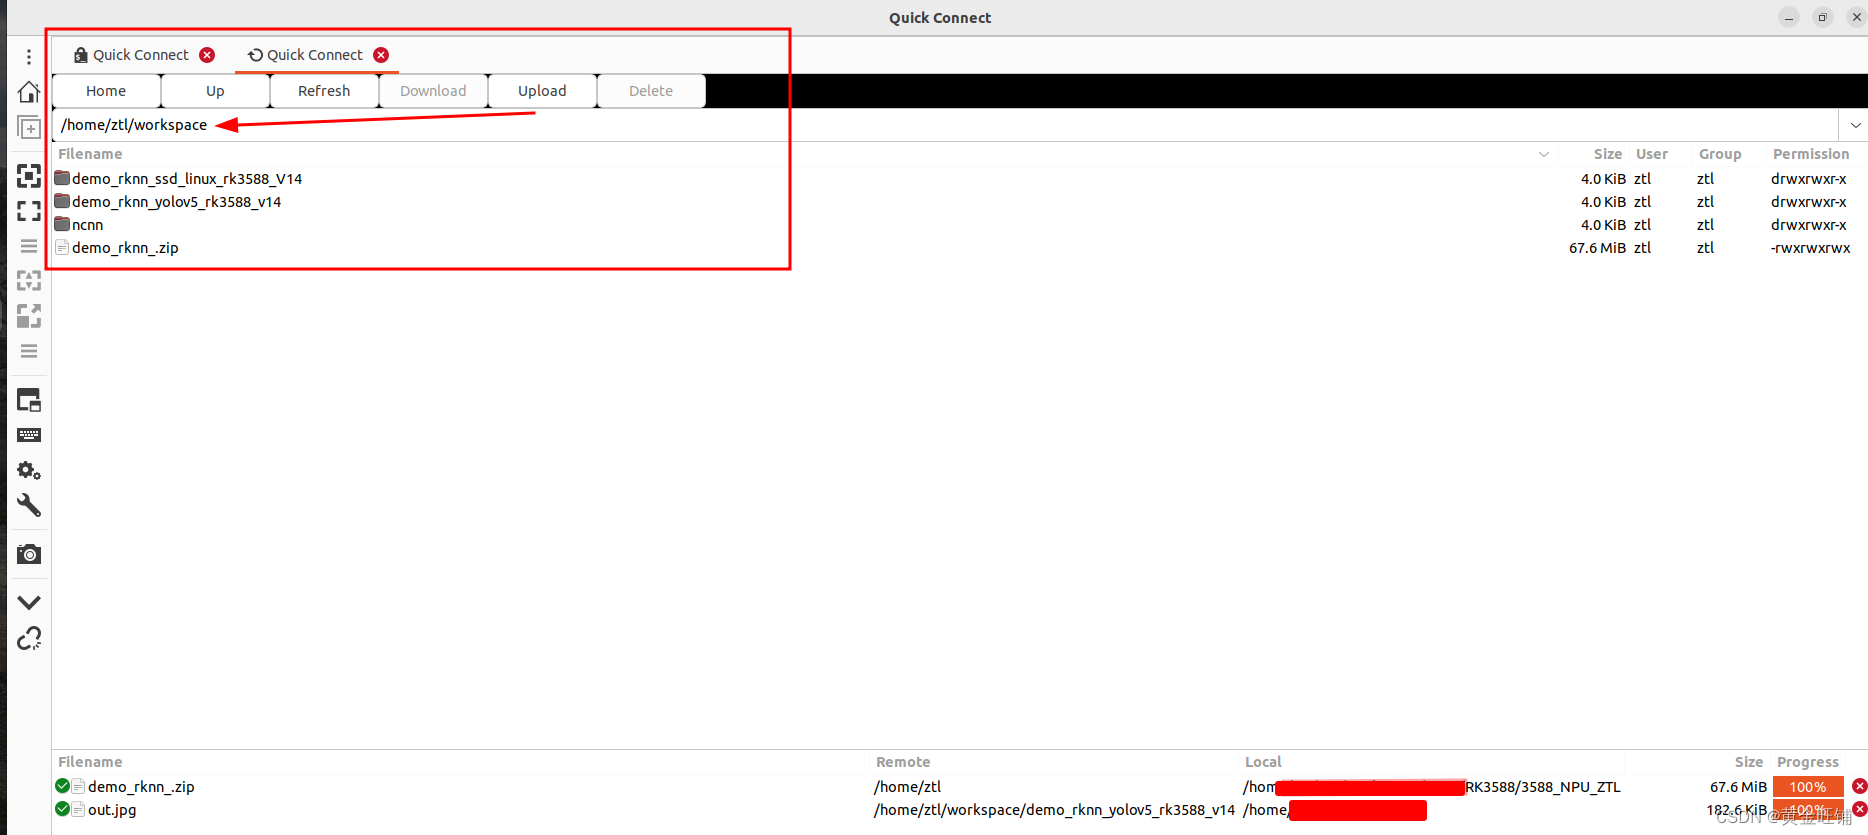
在宿主机上打开 Remmina, 输入 IP地址,用户名,密码 连接开发板。将以上文件下载后,放到开发板上,并解压。
![在这里插入图片描述]()
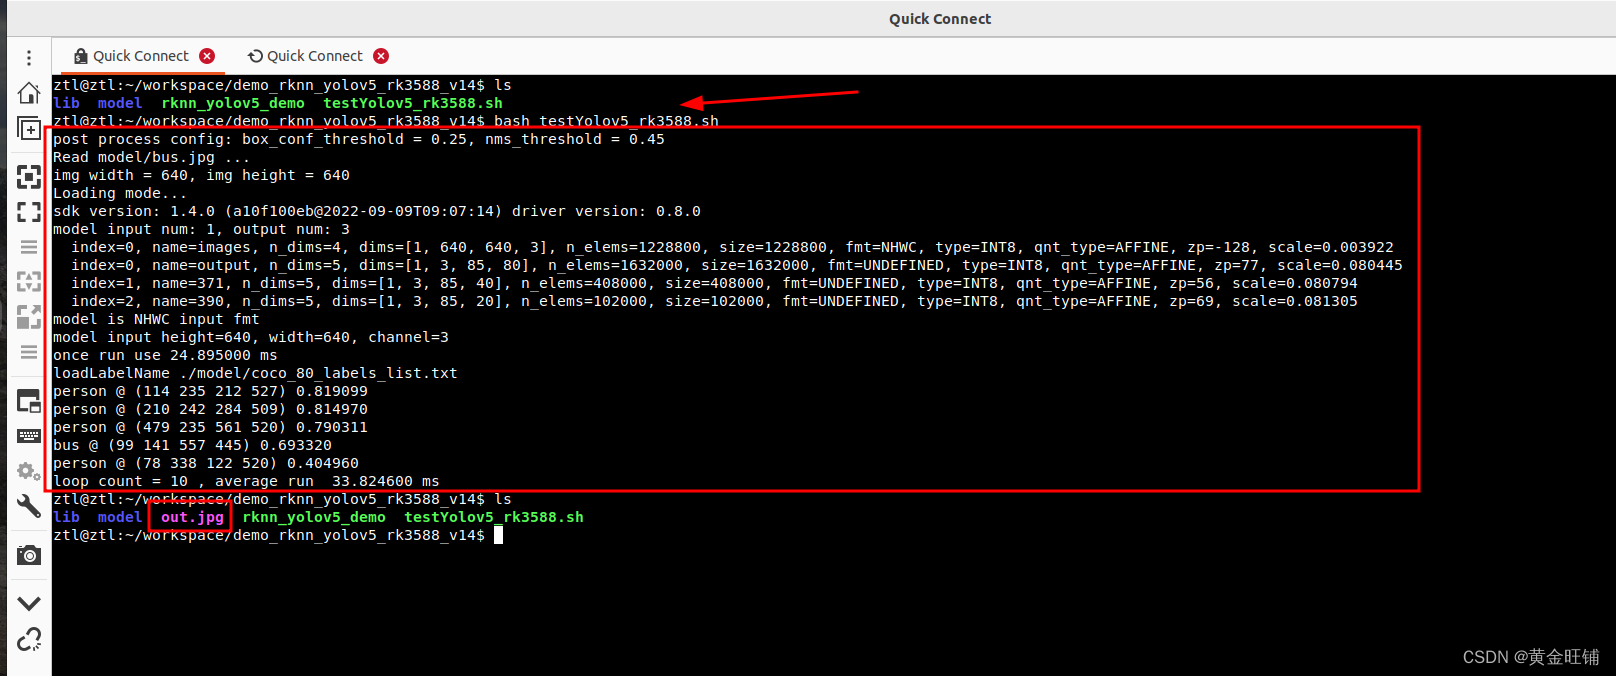
![在这里插入图片描述]()
可以看到在 RK3588 上利用 NPU 运行 yolov5 模型,耗时在 33.8 ms 左右。板端环境已经具备。
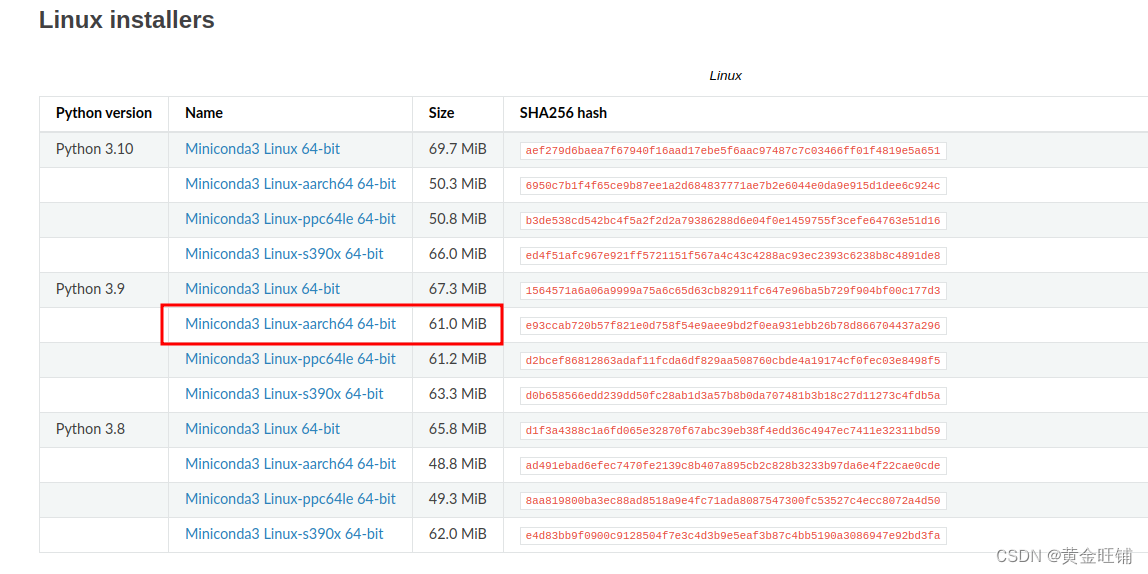
1. 安装 Miniconda
在板端下载 Miniconda, 版本为
![在这里插入图片描述]()
bash Miniconda3-py39_23.3.1-0-Linux-aarch64.sh
一路安装直到成功。
2. 虚拟环境
在板端安装完成后。创建并激活虚拟环境
conda create -n rknn python=3.9
conda activate rknn
进入 rknn_toolkit_lite2 目录,
3. 安装环境依赖
pip install packages/rknn_toolkit_lite2-1.4.0-cp39-cp39-linux_aarch64.whl
如果安装较慢,修改国内的 pip 源,
pip config set global.index-url https://pypi.tuna.tsinghua.edu.cn/simple
如果缺少其他包库,直接用 pip 进行安装。
4. 测试验证
进入目录 examples/inference_with_lite ,
执行 python test.py 即可。
至此,板端的 rknn_toolkit_lite2 已经安装和验证完毕。后续可以在板端进行开发和部署 python 程序。
NOTE
如果执行 python test.py 提示缺少 librknnrt.so 或 librga.so 库,请在 github 下载,或者在其他目录下将 librknnrt.so 或 librga.so 拷贝至 /usr/lib 目录中。
如果想在板端打开终端时默认启动 rknn 的虚拟环境,
vi ~/.bashrc
在里面添加 conda activate rknn
(三)宿主机
1. 创建并激活虚拟环境
安装 rknn 虚拟环境
conda create -n rknn python=3.8
conda activate rknn
安装 pytorch 虚拟环境
conda create -n pytorch
这里可以简单一点,创建 pytorch 环境的依赖, 也可以按照 pytorch 官方教程下载相应的包。
pip install ultralytics
缺啥补啥: pip install xx
2. 安装依赖
进入 rknn 虚拟环境, 并进入 rknn-toolkit2 目录,
source activate rknn
pip install -r doc/requirements_cp38-1.4.0.txt
requirements_cp38-1.4.0.txt 文件内容如下:
# if install failed, please change the pip source to 'https://mirror.baidu.com/pypi/simple'

# base deps
numpy==1.19.5
protobuf==3.12.2
flatbuffers==1.12

# utils
requests==2.27.1
psutil==5.9.0
ruamel.yaml==0.17.4
scipy==1.5.4
tqdm==4.64.0
bfloat16==1.1
opencv-python==4.5.5.64

# base
onnx==1.9.0
onnxoptimizer==0.2.7
onnxruntime==1.10.0
torch==1.10.1
torchvision==0.11.2
tensorflow==2.6.2
3. 安装环境
进入 rknn 虚拟环境, 并进入 rknn-toolkit2 目录
source activate rknn
pip install packages/rknn_toolkit2-1.4.0_22dcfef4-cp38-cp38-linux_x86_64.whl
4. 进入 rknn 虚拟环境, 并验证是否安装成功 rknn
source activate rknn
![在这里插入图片描述]()
python 进入开发环境
from rknn.api import RKNN
没有报错,就说明 RKNN 已经安装成功。
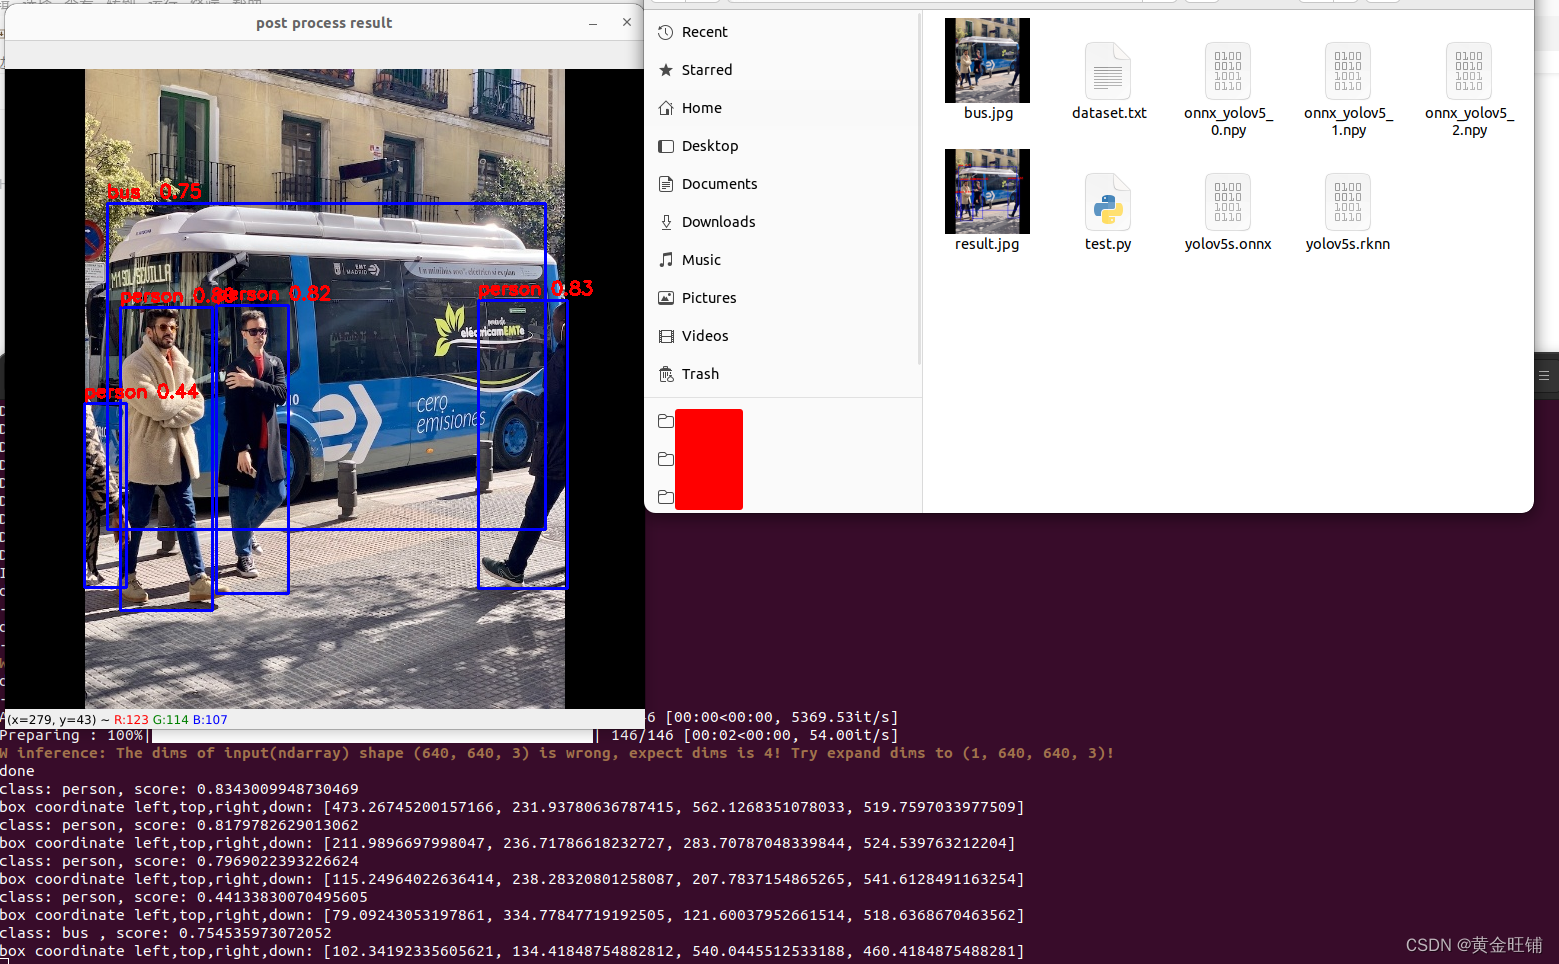
5. 测试
在宿主机上,进入 rknn 虚拟环境,
cd examples/onnx/yolov5/
tree .
.
├── bus.jpg
├── dataset.txt
├── test.py
└── yolov5s.onnx
python test.py
![在这里插入图片描述]()
6. 将 rknn 模型放到板端验证
将上述步骤生成的 yolov5s.rknn 放到板端测试。
.
├── lib
│   ├── librga.so
│   └── librknnrt.so
├── model
│   ├── RK356X
│   │   └── yolov5s-640-640.rknn
│   ├── RK3588
│   │   ├── yolov5s-640-640.rknn
│   │   └── yolov5s.rknn
│   ├── RV110X
│   │   └── yolov5s-640-640.rknn
│   ├── bus.jpg
│   └── coco_80_labels_list.txt
├── out.jpg
├── rknn_yolov5_demo
└── testYolov5_rk3588.sh
修改 板端 文件
bash testYolov5_rk3588.sh 中的
./rknn_yolov5_demo model/RK3588/yolov5s-640-640.rknn model/bus.jpg
为
./rknn_yolov5_demo model/RK3588/yolov5s.rknn model/bus.jpg。
并在板端执行 bash testYolov5_rk3588.sh
ztl@ztl:~/workspace/demo_rknn_yolov5_rk3588_v14$ bash testYolov5_rk3588.sh
post process config: box_conf_threshold = 0.25, nms_threshold = 0.45
Read model/bus.jpg ...
img width = 640, img height = 640
Loading mode...
E RKNN: [05:25:08.050] failed to check rknpu hardware version: 0x46495245
E RKNN: [05:25:08.050] This rknn model is for RK3566, but current platform is RK3588
E RKNN: [05:25:08.050] rknn_init, load model failed!
rknn_init error ret=-1
出现报错信息,重新在宿主机平台上设置平台信息;
将
rknn.config(mean_values=[[0, 0, 0]], std_values=[[255, 255, 255]])
修改为
rknn.config(mean_values=[[0, 0, 0]], std_values=[[255, 255, 255]], target_platform='rk3588')
并重新执行
python test.py
生成 yolov5s.rknn 模型并上传到板端对应位置。
重新在板端执行 bash testYolov5_rk3588.sh,运行效果正常。
至此,已经可以在 宿主机 上用给定的 demo 转换模型,并将模型上传到 板端 ,可以正确运行。
NOTE:共有四种方式开发和部署
- 第一种是借助
RKNN-Toolkit2 的功能在模拟 NPU 上运行 RKNN 模型并获取推理结果(在PC端)
- 第二种是借助
RKNN-Toolkit2 的功能, 将板子与 PC 连接,将 RKNN 模型分发到指定的 NPU 设备进行推理并获取推理结果(网络推理在板端,脚本写在 PC 端)
- 第三种是调用
RKNN SDK 的 C/C++ 语言 API 进行测试代码编写,并使用交叉编译器进行编译,将得到的可执行文件拷贝到板子上运行(开发编译在 PC 端,运行在板端),此处也可以通过 VS Code 连接板端,在板端开发应用。
- 第四种是在板端安装
rknn-toolkit2-lite 工具,使用 python 脚本在板端推理(代码开发运行都在板端)
三、yolov5 训练自己的模型
(一)虚拟环境再次验证
我的电脑上有多个虚拟环境,一个是 pytorch ( 常用的深度学习框架的虚拟环境 ), 一个是 rknn( 就是之前安装 toolkit2 时新建的虚拟环境)。
pytorch虚拟环境信息
(base) jxx@desk:~$ source activate pytorch
(pytorch) jxx@desk:~$ python
Python 3.10.11 (main, Apr 20 2023, 19:02:41) [GCC 11.2.0] on linux
Type "help", "copyright", "credits" or "license" for more information.
>>> import torch
>>> import torchvision
>>> print(torch.__version__)
2.0.0+cu117
>>> print(torchvision.__version__)
0.15.1+cu117
rknn虚拟环境信息
(base) jxx@desk:~$ source activate rknn
(rknn) jxx@desk:~$ python
Python 3.8.16 (default, Mar  2 2023, 03:21:46)
[GCC 11.2.0] :: Anaconda, Inc. on linux
Type "help", "copyright", "credits" or "license" for more information.
>>> import torch
>>> import torchvision
>>> print(torch.__version__)
1.10.1+cu102
>>> print(torchvision.__version__)
0.11.2+cu102
>>>
(二)仓库源码
直接下载 rknn_dev yolov5 github,并切换到 rknn_dev 分支
git clone https://github.com/wangqiqi/yolov5
git checkout rknn_dev # 切换到 rknn_dev 分支
预训练模型下载地址
yolov5s
(三)训练
1. 标注数据
可以用 cvat 或者 labelme 或者其他工具对检测数据进行标注。
在 yolov5 同级目录新建一个 datasets 文件夹,将标注好的数据打包到项目名称文件夹,然后放到 datasets 目录下,后续其他项目也可以同样进行。
2. 修改参数
(1)修改 ./data/proj.yaml
在 yolov5 文件下找到 data 目录,新建一个 proj.yaml 文件,类似于 drp.yaml。
修改 proj.yaml 中的 nc 和 names;
nc: 类别数
names: 类别名称列表
(2)修改 config_onekey.sh
根据项目要求,修改 config_onekey.sh 文件中的相关参数;
例如:
__PRJNAME, __EPOCHSZ, __BATCHSZ, __IMSZ 等等。
3. 开始一键训练
前提条件: 已经创建了虚拟环境 pytorch
前提条件: 已经创建了虚拟环境 pytorch
前提条件: 已经创建了虚拟环境 pytorch
下载预训练模型到 yolov5 同级目录 pre-trained 文件夹下,预训练模型下载地址
预训练模型下载地址
yolov5s
在训练之前确定 ./models/yolo.py 文件中的 class Detect(nn.Module): 类 line:55 里 forward 代码是否解注释了。
如果训练, forward 应为
    def forward(self, x):
        z = []  # inference output
        for i in range(self.nl):
            x[i] = self.m[i](x[i])  # conv

        ## 此处如果是训练, 请解开以下注释
            bs, _, ny, nx = x[i].shape  # x(bs,255,20,20) to x(bs,3,20,20,85)
            x[i] = x[i].view(bs, self.na, self.no, ny, nx).permute(0, 1, 3, 4, 2).contiguous()

            if not self.training:  # inference
                if self.grid[i].shape[2:4] != x[i].shape[2:4] or self.onnx_dynamic:
                    self.grid[i] = self._make_grid(nx, ny).to(x[i].device)

                y = x[i].sigmoid()
                if self.inplace:
                    y[..., 0:2] = (y[..., 0:2] * 2. - 0.5 + self.grid[i]) * self.stride[i]  # xy
                    y[..., 2:4] = (y[..., 2:4] * 2) ** 2 * self.anchor_grid[i]  # wh
                else:  # for YOLOv5 on AWS Inferentia https://github.com/ultralytics/yolov5/pull/2953
                    xy = (y[..., 0:2] * 2. - 0.5 + self.grid[i]) * self.stride[i]  # xy
                    wh = (y[..., 2:4] * 2) ** 2 * self.anchor_grid[i].view(1, self.na, 1, 1, 2)  # wh
                    y = torch.cat((xy, wh, y[..., 4:]), -1)
                z.append(y.view(bs, -1, self.no))

        return x if self.training else (torch.cat(z, 1), x)
开始一键训练
前提条件: 已经创建了虚拟环境 pytorch
前提条件: 已经创建了虚拟环境 pytorch
前提条件: 已经创建了虚拟环境 pytorch
bash onekey_bash/train.sh
终端显示如下:
(base) jxxx@desk:~/workspace/algo/yolov5_rknn$ bash onekey_bash/train.sh
train: weights=../pre-trained/yolov5s.pt, cfg=, data=data/drp.yaml, hyp=data/hyps/hyp.scratch.yaml, epochs=100, batch_size=32, imgsz=320, rect=True, resume=False, nosave=False, noval=False, noautoanchor=False, evolve=None, bucket=, cache=None, image_weights=False, device=, multi_scale=False, single_cls=False, adam=False, sync_bn=False, workers=8, project=runs/train, entity=None, name=drp, exist_ok=True, quad=False, linear_lr=False, label_smoothing=0.0, upload_dataset=False, bbox_interval=-1, save_period=-1, artifact_alias=latest, local_rank=-1, freeze=0, patience=100
github: ⚠️ YOLOv5 is out of date by 1203 commits. Use `git pull` or `git clone git@github.com:wangqiqi/yolov5` to update.
YOLOv5 🚀 c5360f6 torch 2.0.0+cu117 CUDA:0 (NVIDIA GeForce RTX 4090, 24209.125MB)

hyperparameters: lr0=0.01, lrf=0.2, momentum=0.937, weight_decay=0.0005, warmup_epochs=3.0, warmup_momentum=0.8, warmup_bias_lr=0.1, box=0.05, cls=0.5, cls_pw=1.0, obj=1.0, obj_pw=1.0, iou_t=0.2, anchor_t=4.0, fl_gamma=0.0, hsv_h=0.015, hsv_s=0.7, hsv_v=0.4, degrees=0.0, translate=0.1, scale=0.5, shear=0.0, perspective=0.0, flipud=0.0, fliplr=0.5, mosaic=1.0, mixup=0.0, copy_paste=0.0
Weights & Biases: run 'pip install wandb' to automatically track and visualize YOLOv5 🚀 runs (RECOMMENDED)
TensorBoard: Start with 'tensorboard --logdir runs/train', view at http://localhost:6006/
Overriding model.yaml nc=80 with nc=1

                 from  n    params  module                                  arguments
  0                -1  1      3520  models.common.Focus                     [3, 32, 3]
  1                -1  1     18560  models.common.Conv                      [32, 64, 3, 2]
  2                -1  1     18816  models.common.C3                        [64, 64, 1]
  3                -1  1     73984  models.common.Conv                      [64, 128, 3, 2]
  4                -1  3    156928  models.common.C3                        [128, 128, 3]
  5                -1  1    295424  models.common.Conv                      [128, 256, 3, 2]
  6                -1  3    625152  models.common.C3                        [256, 256, 3]
  7                -1  1   1180672  models.common.Conv                      [256, 512, 3, 2]
  8                -1  1    656896  models.common.SPP                       [512, 512, [5, 9, 13]]
  9                -1  1   1182720  models.common.C3                        [512, 512, 1, False]
 10                -1  1    131584  models.common.Conv                      [512, 256, 1, 1]
 11                -1  1         0  torch.nn.modules.upsampling.Upsample    [None, 2, 'nearest']
 12           [-1, 6]  1         0  models.common.Concat                    [1]
 13                -1  1    361984  models.common.C3                        [512, 256, 1, False]
 14                -1  1     33024  models.common.Conv                      [256, 128, 1, 1]
 15                -1  1         0  torch.nn.modules.upsampling.Upsample    [None, 2, 'nearest']
 16           [-1, 4]  1         0  models.common.Concat                    [1]
 17                -1  1     90880  models.common.C3                        [256, 128, 1, False]
 18                -1  1    147712  models.common.Conv                      [128, 128, 3, 2]
 19          [-1, 14]  1         0  models.common.Concat                    [1]
 20                -1  1    296448  models.common.C3                        [256, 256, 1, False]
 21                -1  1    590336  models.common.Conv                      [256, 256, 3, 2]
 22          [-1, 10]  1         0  models.common.Concat                    [1]
 23                -1  1   1182720  models.common.C3                        [512, 512, 1, False]
 24      [17, 20, 23]  1     16182  models.yolo.Detect                      [1, [[10, 13, 16, 30, 33, 23], [30, 61, 62, 45, 59, 119], [116, 90, 156, 198, 373, 326]], [128, 256, 512]]
 ....
 ....
 ....

     Epoch   gpu_mem       box       obj       cls    labels  img_size
     98/99     1.76G   0.02157  0.007322         0         3       320: 100%|███████████████████████████████████████████████████████████████████████████████████████████████| 59/59 [00:04<00:00, 13.07it/s]
               Class     Images     Labels          P          R     mAP@.5 mAP@.5:.95: 100%|███████████████████████████████████████████████████████████████████████████████| 30/30 [00:03<00:00,  7.54it/s]
                 all       1860       3277      0.979      0.962      0.991      0.727

     Epoch   gpu_mem       box       obj       cls    labels  img_size
     99/99     1.76G    0.0217  0.007213         0         3       320: 100%|███████████████████████████████████████████████████████████████████████████████████████████████| 59/59 [00:04<00:00, 12.90it/s]
               Class     Images     Labels          P          R     mAP@.5 mAP@.5:.95: 100%|███████████████████████████████████████████████████████████████████████████████| 30/30 [00:04<00:00,  6.66it/s]
                 all       1860       3277      0.979      0.967      0.992      0.737

100 epochs completed in 0.244 hours.
Optimizer stripped from runs/train/drp/weights/last.pt, 14.3MB
Optimizer stripped from runs/train/drp/weights/best.pt, 14.3MB
Results saved to runs/train/drp
(四)导出模型
前提条件: 已经创建了虚拟环境 rknn
前提条件: 已经创建了虚拟环境 rknn
前提条件: 已经创建了虚拟环境 rknn
问题及解决方案
解决 AttributeError: module ‘numpy‘ has no attribute ‘int‘ 训练yolo时的问题 原因:np.int在NumPy 1.20中已弃用,在NumPy 1.24中已删除。
一步真实解决RuntimeError: result type Float can‘t be cast to the desired output type long int
在训练之前确定 ./models/yolo.py 文件中的 class Detect(nn.Module): 类 line:55 里 forward 代码是否注释了。
此时应修改 forward 代码为:
    def forward(self, x):
        z = []  # inference output
        for i in range(self.nl):
            x[i] = self.m[i](x[i])  # conv
        return x # 此处如果是训练, 请注释
1. 修改参数
- 修改
config_onekey.sh 相关参数
- 将测试用的图片放到
export 文件夹下,修改 proj_dataset.txt 的内容为自己的图片列表
2. 开始一键导出
前提条件: 已经创建了虚拟环境 pytorch
前提条件: 已经创建了虚拟环境 pytorch
前提条件: 已经创建了虚拟环境 pytorch
bash onekey_bash/export_rknn.sh
终端显示如下:
(base) jxxx@desk:~/workspace/algo/yolov5_rknn$ bash onekey_bash/export_rknn.sh
export: weights=runs/train/drp/weights/best.pt, img_size=[320], batch_size=1, device=cpu, include=['torchscript', 'onnx'], half=False, inplace=False, train=False, optimize=True, dynamic=False, simplify=True, opset=12
YOLOv5 🚀 c5360f6 torch 2.0.0+cu117 CPU

Fusing layers...
Model Summary: 224 layers, 7053910 parameters, 0 gradients, 16.3 GFLOPs

PyTorch: starting from runs/train/drp/weights/best.pt (14.3 MB)

TorchScript: starting export with torch 2.0.0+cu117...
TorchScript: export success, saved as runs/train/drp/weights/best.torchscript.pt (28.3 MB)

ONNX: starting export with onnx 1.13.1...
...
...
I rknn buiding done
done
--> Export rknn model
done
--> Init runtime environment
W init_runtime: Target is None, use simulator!
done
(0.3333333333333333, 0.3333333333333333) 0.0 70.0
--> Running model
Analysing : 100%|███████████████████████████████████████████████| 161/161 [00:00<00:00, 5866.87it/s]
Preparing : 100%|█████████████████████████████████████████████████| 161/161 [00:04<00:00, 39.76it/s]
W inference: The dims of input(ndarray) shape (320, 320, 3) is wrong, expect dims is 4! Try expand dims to (1, 320, 320, 3)!
W inference: The dims of input(ndarray) shape (320, 320, 3) is wrong, expect dims is 4! Try expand dims to (1, 320, 320, 3)!
W inference: The dims of input(ndarray) shape (320, 320, 3) is wrong, expect dims is 4! Try expand dims to (1, 320, 320, 3)!
W inference: The dims of input(ndarray) shape (320, 320, 3) is wrong, expect dims is 4! Try expand dims to (1, 320, 320, 3)!
done
class: person, score: 0.8913032412528992
box coordinate topleft: (159.54501259326935, 145.2426918745041), bottomright: (177.8633736371994, 186.3882895708084)
class: person, score: 0.8837643265724182
box coordinate topleft: (82.14642906188965, 183.73637676239014), bottomright: (110.66749000549316, 226.49699115753174)
class: person, score: 0.8643947243690491
box coordinate topleft: (146.98097324371338, 140.67060202360153), bottomright: (164.14344692230225, 166.86144143342972)
class: person, score: 0.8264284729957581
box coordinate topleft: (110.99540531635284, 146.92019426822662), bottomright: (130.9836596250534, 177.2033714056015)
class: person, score: 0.7860860824584961
box coordinate topleft: (146.88146114349365, 127.81136840581894), bottomright: (163.5996789932251, 148.1453576683998)
class: person, score: 0.7520475387573242
box coordinate topleft: (170.8560609817505, 123.72485554218292), bottomright: (185.6856870651245, 143.04388225078583)
class: person, score: 0.6209931373596191
box coordinate topleft: (108.76676034927368, 133.68206477165222), bottomright: (119.2998595237732, 156.40799260139465)
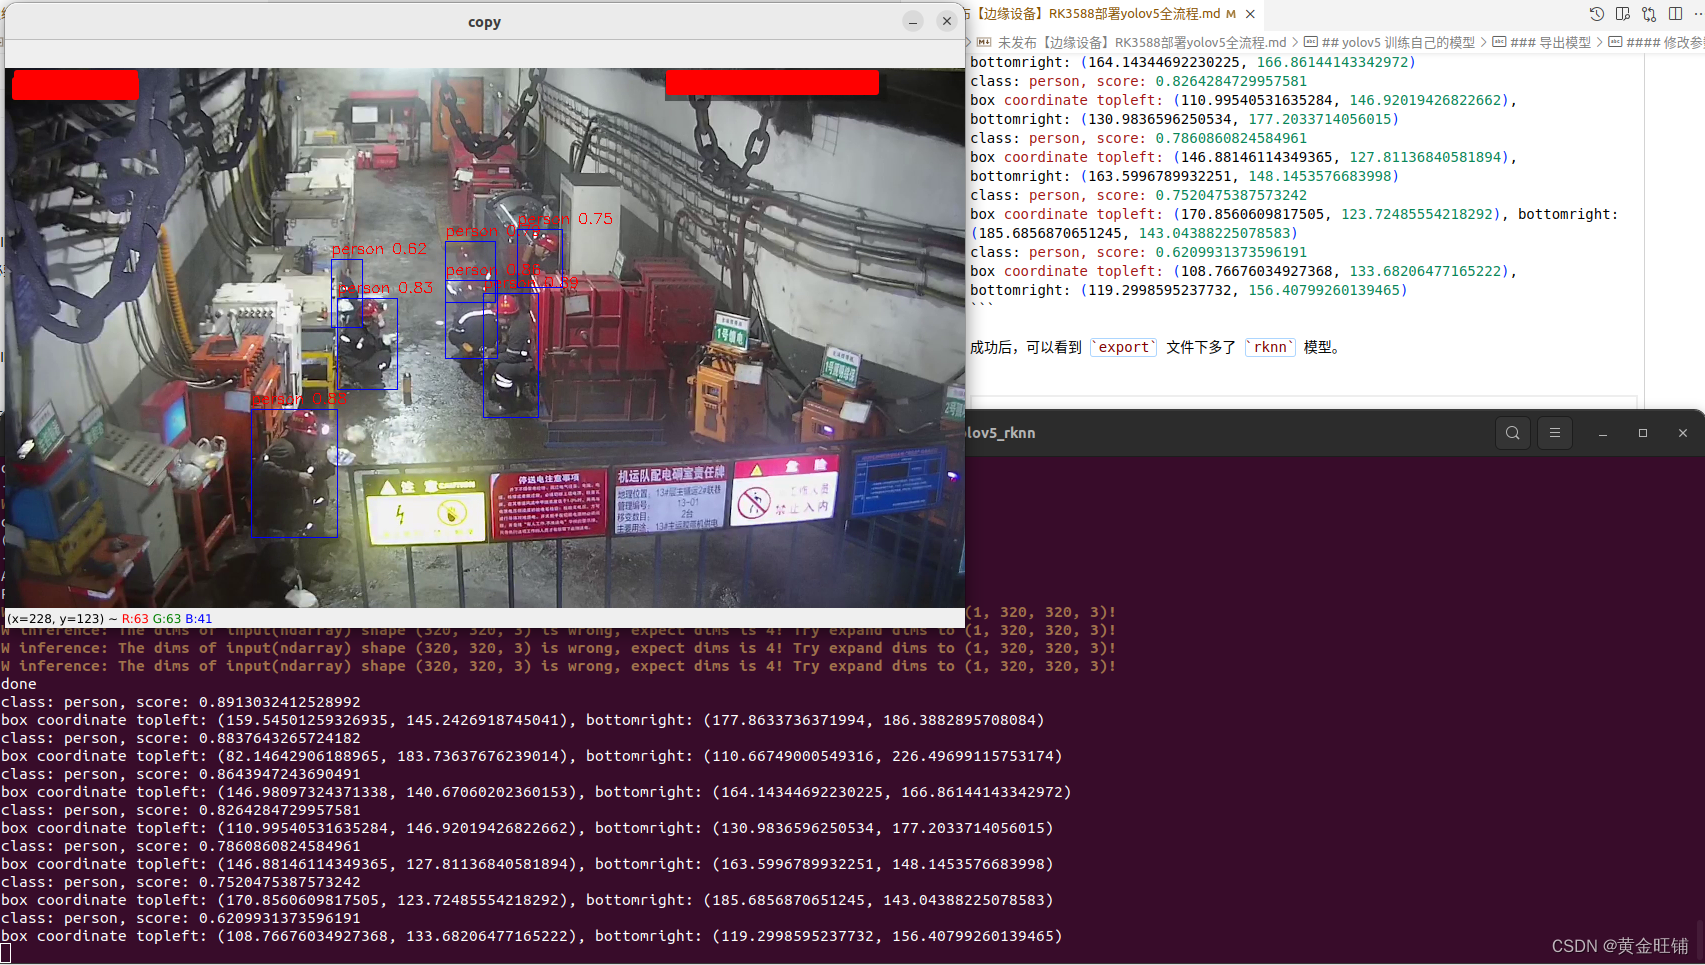
成功后,可以看到 export 文件下多了 rknn 模型。
![在这里插入图片描述]()
(五)部署测试模型(见下一篇博文)
【边缘设备】yolov5训练与rknn模型导出并在RK3588部署(亲测有效)二
附录信息
| 仓库 |
说明 |
| https://github.com/rockchip-linux/rknpu2 |
RKNPU2 provides an advanced interface to access Rockchip NPU.
Support Platform:
- RK3566/RK3568
- RK3588/RK3588S- RV1103/RV1106
Note: The rknn model must be generated using
RKNN Toolkit 2: https://github.com/rockchip-linux/rknn-toolkit2 |
| https://github.com/rockchip-linux/rknn-toolkit2 |
RKNN-Toolkit2 is a software development kit for users to
perform model conversion, inference and performance evaluation on PC
and Rockchip NPU platforms (RK3566, RK3568, RK3588, RK3588S, RV1103, RV1106).
RKNN-Toolkit-Lite2 provides Python programming interfaces for Rockchip NPU platform
(RK3566, RK3568, RK3588, RK3588S) to help users deploy RKNN models and
accelerate the implementation of AI applications.
For the deployment of the RKNN model, please refer to:
https://github.com/rockchip-linux/rknpu2
For RK1808/RV1109/RV1126/RK3399Pro, please use:
https://github.com/rockchip-linux/rknn-toolkit
https://github.com/rockchip-linux/rknpu
https://github.com/airockchip/RK3399Pro_npuNOTES:
- Currently rknn-toolkit2 is not compatible with rknn-toolkit
- Currently only support on Ubuntu 18.04 python 3.6 / Ubuntu 20.04 python 3.8
- Latest version:1.4.0(Release version) |
|
|
| 平台 |
仓库 |
| RK3566/RK3568/RK3588/RK3588S/RV1103/RV1106 |
https://github.com/rockchip-linux/rknn-toolkit2
https://github.com/rockchip-linux/rknpu2 |
| RK1808/RK1806/RV1109/RV1126 |
https://github.com/rockchip-linux/rknn-toolkit
https://github.com/rockchip-linux/rknpu |
| RK3399Pro |
https://github.com/rockchip-linux/rknn-toolkit
https://github.com/airockchip/RK3399Pro_npu |
规格书
3588 Datasheet
![在这里插入图片描述]()
![在这里插入图片描述]()
参考(以下为编撰本文的引用参考)
- yolov5训练pt模型并转换为rknn模型,部署在RK3588开发板上——从训练到部署全过程
- RK3588模型推理总结
- NPU使用
- 一步一步教大家使用RK3588的NPU之在电脑端交叉编译yolov5运行在ARM平台上-哔哩哔哩
- 转换yolov5s.onnx为rknn模型RK3588主板实时推理和电脑端模拟推理-哔哩哔哩
- 摆脱电脑,直接在RK3588平台上推理,帮用户部署 RKNN 模加速 AI 应用的落地-哔哩哔哩】
- 仓库下载 参考 rknn-toolkit 教程, 需要切换到 commit ID
c5360f6e7009eb4d05f14d1cc9dae0963e949213, 可以直接在 官网github下载, 然后终端执行 git checkout c5360f6e7。